
Key takeaways
- Using a damaged band: Small cuts can grow quickly under tension. Discard bands with visible deterioration.
- Anchoring to unsuitable furniture: Do not attach a band to a rolling chair, lightweight table, towel rack, cabinet handle, or radiator.
- Pulling toward your face: Keep the band away from your eyes and mouth, particularly during chest presses, overhead work, and rapid movements.
- Overstretching: More stretch is not automatically better. Excessive length increases snapback risk and may make the resistance too difficult to control.
- Moving too fast: Momentum reduces muscular control. Slow down, especially during the return phase.
- Letting knees or wrists collapse: Keep knees tracking generally over your toes and wrists straight rather than bent sharply backward.
- Doubling bands without checking compatibility: Combining bands can produce much more resistance than expected. Progress one level at a time.
- Ignoring skin irritation: Wear clothing that covers areas where the band rubs, and stop if you develop a rash or blister.
Resistance bands are simple, portable, and surprisingly versatile—but poor setup or rushed technique can turn a low-impact workout into a painful one. A band can snap back toward your face, slide across a floor, pull a door open, or overload a joint when you use too much tension. The safest approach is to inspect the equipment, secure every attachment, choose manageable resistance, and move slowly through a controlled range of motion. Use this guide to learn how to use resistance bands safely at home, whether you are beginning a routine or adding bands to an established strength program in 2026.
What You Need
| Item | Why | Optional? |
|---|---|---|
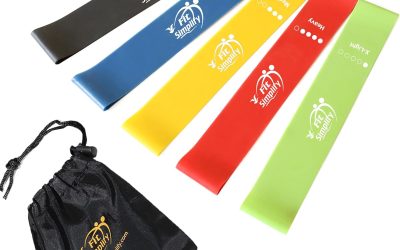
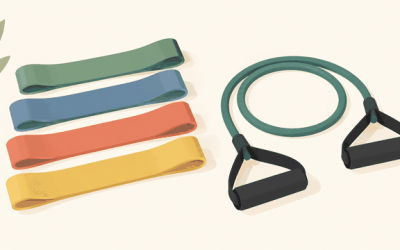
| Resistance loop bands | A set with several resistance levels lets you match the band to each exercise. For example, a five-band Fit Simplify set includes an instruction guide and carry bag and is listed at about $9.98. | No |
| Stable exercise surface | A nonslip mat or clear, level floor helps prevent your feet from sliding and reduces distractions. Leave at least 6 feet of open space around you. | Mat optional; clear space is not |
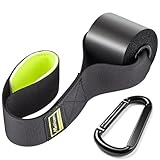
| Door anchor | An anchor creates more exercise options, including rows and pulldowns. A padded Manificent door anchor compatible with loop bands, resistance tubes, TRX, and yoga straps is listed at about $6.97. | Yes |
| Closed, sturdy door | When using an anchor, the door must close fully and latch securely. A hollow, damaged, or poorly latched door may not hold the load. | Only if using an anchor |
| Comfortable athletic shoes | Firm footing improves balance for standing movements and helps prevent the band from slipping under your shoes. | Recommended |
Do not use a band that is cracked, brittle, sticky, deeply nicked, or visibly stretched out of shape. Keep latex and rubber bands away from direct sunlight, heaters, sharp edges, and oils. Store them loosely in a cool, dry place rather than tying tight knots in them.
As an Amazon Associate we earn from qualifying purchases at no extra cost to you. Product prices and availability are accurate as of the date shown and are subject to change.

Step-by-Step
1. Inspect the band and clear your space (2 minutes)
Run your fingers along the entire band and look for cuts, thin spots, tears, discoloration, or areas that feel unusually soft. Check handles, clips, stitching, and anchors if your equipment has them. Retire any questionable piece instead of testing it under tension.
Remove furniture, pets, toys, and other tripping hazards. Make sure the floor is dry. If you will stand on the band, wear shoes with solid soles and confirm the band is centered beneath both feet.
2. Choose a manageable resistance level (1 minute)
Start with the lightest band or a level that allows about 10 to 15 smooth repetitions. The final two repetitions should feel challenging but should not make you hold your breath, twist, shrug, or lose control. If the band pulls you out of position, choose less resistance.
Remember that a band becomes harder to pull as it stretches. A band that feels easy at the starting position may become demanding near the end of a repetition. Leave enough room to move without forcing the band to its maximum stretch. Unless the manufacturer provides a specific limit, avoid stretching a band more than roughly twice its relaxed length.
3. Warm up and practice the motion (5 minutes)
Begin with two to five minutes of easy movement, such as marching in place, shoulder circles, bodyweight squats, or gentle hip hinges. Then perform five slow practice repetitions without the band, concentrating on the intended path.
Keep your ribs stacked over your pelvis, brace your midsection gently, and maintain a neutral spine. Do not lock your knees or elbows aggressively. Breathe out during the effort and breathe in as you return to the starting position.
4. Set up a basic standing exercise (3 minutes)
For a safe first exercise, try a standing row with the band wrapped around a sturdy post or held around your feet while seated. If standing on the band, place your feet about hip-width apart and use equal lengths on both sides. Hold the ends or handles with your palms facing inward.
Pull your elbows toward your ribs without lifting your shoulders. Stop when your hands reach your torso, pause briefly, and return slowly. Complete one set of 10 to 15 repetitions. The band should remain aligned with your hands and should not rub against your neck or face.
5. Use a door anchor correctly (3 minutes)
If you use a door anchor, place it on the hinge side of a door whenever possible, so pulling generally moves the door toward its frame rather than toward you. Follow the anchor’s instructions for positioning. Close and latch the door completely, then test it with a few gentle pulls before adding strong tension.
Keep your body several feet from the door and maintain a clear line between the anchor and your hands. Never place an anchor over a sharp door edge, use it on a door with loose hinges, or pull hard on a door that can swing freely. If the anchor shifts, slips, or pinches the band, stop immediately.
6. Perform controlled sets (10–15 minutes)
For most beginners, one or two sets of 8 to 15 repetitions per exercise is enough. Move through a comfortable range and take about two seconds to pull and two to three seconds to return. Rest for 45 to 90 seconds between sets.
Stop a set if you feel sharp, sudden, burning, or electric pain; numbness or tingling; unusual joint pressure; dizziness; or loss of balance. Normal muscle fatigue should ease after the set. It should not change your technique or cause pain in a joint.
7. Release tension safely and cool down (3–5 minutes)
Before removing the band from your feet, anchor, or hands, reduce the tension gradually. Do not let it snap back. Keep your face, eyes, and other people away from the band’s path. After the workout, walk slowly, breathe normally, and perform gentle, pain-free mobility movements.
Mistakes to Avoid
- Using a damaged band: Small cuts can grow quickly under tension. Discard bands with visible deterioration.
- Anchoring to unsuitable furniture: Do not attach a band to a rolling chair, lightweight table, towel rack, cabinet handle, or radiator.
- Pulling toward your face: Keep the band away from your eyes and mouth, particularly during chest presses, overhead work, and rapid movements.
- Overstretching: More stretch is not automatically better. Excessive length increases snapback risk and may make the resistance too difficult to control.
- Moving too fast: Momentum reduces muscular control. Slow down, especially during the return phase.
- Letting knees or wrists collapse: Keep knees tracking generally over your toes and wrists straight rather than bent sharply backward.
- Doubling bands without checking compatibility: Combining bands can produce much more resistance than expected. Progress one level at a time.
- Ignoring skin irritation: Wear clothing that covers areas where the band rubs, and stop if you develop a rash or blister.
How Often
Strength-train with resistance bands two or three nonconsecutive days per week, leaving at least 24 to 48 hours before training the same muscle groups hard again. Start with 15 to 25 minutes, including a warm-up and cool-down. On other days, walking, light mobility, or easy cardio can complement your routine.
Increase difficulty only when you can complete all repetitions with steady breathing and consistent form. Change one variable at a time: add two or three repetitions, use a slightly stronger band, or add one set. If soreness lasts more than 48 hours or affects normal movement, reduce volume or take an additional rest day.
When to Call a Pro or Replace
Consult a qualified physical therapist, certified personal trainer, or healthcare professional if you are returning after surgery or an injury, managing osteoporosis, experiencing recurring joint pain, or unsure how to modify an exercise. Seek urgent medical care for chest pain, severe shortness of breath, fainting, a suspected fracture, or sudden weakness.
Replace a band immediately if it has a tear, deep abrasion, sticky surface, hardened sections, severe fading, or permanent deformation. Replace an anchor if its padding, stitching, loop, clip, or attachment point is damaged. Equipment that slips during a gentle test is not safe for a workout.
FAQ
Are resistance bands safe for beginners?
Yes, when you start with light resistance, use controlled movements, and learn the setup before increasing difficulty. A loop band around the thighs or a light band for rows can be easier to manage than heavy overhead exercises. Stop if pain—not ordinary muscle effort—appears.
How tight should a resistance band be?
It should provide noticeable tension without forcing you to compensate with your back, shoulders, or joints. At the starting position, the band may have slight tension so it does not fall away. During the exercise, you should be able to pause and return slowly without the band snapping you back.
Can I use a resistance band on a door?
Use a purpose-built door anchor and a sturdy, fully latched door. Test the setup with light force first, keep the anchor away from sharp edges, and position yourself so the door is pulled toward its frame when practical. Never use a damaged door or an anchor that shifts.
How do I know when to move to a stronger band?
Move up when you can complete 15 controlled repetitions for every set, maintain normal breathing, and finish without joint discomfort or technique changes. The next resistance should feel challenging by the last few repetitions, not immediately from the first repetition.


Write Your Review
No reviews yet. Be the first to share your experience!