
Key takeaways
- Storing bands wet: Sweat and moisture trapped in a closed container can create odors and accelerate deterioration.
- Using a thin plastic bag for long-term storage: Plastic can trap humidity. If you use the original bag temporarily, make sure the bands are completely dry and the bag is not sealed around damp equipment.
- Leaving bands in direct sunlight: Ultraviolet light and heat can shorten the useful life of elastic materials.
- Making tight knots: Knots create concentrated bends that are difficult to inspect and may permanently distort the band.
- Overfilling a container: Compression from a packed drawer can create folds and put pressure on connectors.
- Mixing dirty and clean equipment: Wipe bands after particularly sweaty sessions instead of storing them immediately with clean accessories.
- Storing with sharp objects: Scissors, tools, keys, and rough-edged hardware can nick the surface.
- Assuming color equals resistance: Color systems vary by manufacturer. Read the label or manual, particularly when replacing one band in a set.
Resistance bands are easy to store until they become a tangled, stretched-out pile on the floor. Poor storage can leave bands kinked under furniture, exposed to heat and sunlight, or rubbing against sharp edges. Over time, that may contribute to cracks, sticky surfaces, permanent deformation, and hardware damage on handled sets. A band that snaps during a workout can also cause an avoidable injury.
The best approach is simple: clean and dry the bands, keep them loosely coiled or flat, separate metal and plastic accessories, and store everything in a cool, shaded location. These steps work for loop bands, tube bands with handles, pull-up assistance bands, and most home workout kits. Use this routine in 2026 and your equipment will be easier to find, inspect, and use safely.
As an Amazon Associate we earn from qualifying purchases at no extra cost to you. Product prices and availability are accurate as of the date shown and are subject to change.


What You Need
| Item | Why | Optional? |
|---|---|---|
| Soft, dry microfiber cloth | Removes sweat, dust, and skin oils without rough abrasion. | No |
| Mild soap and lukewarm water | Useful for cleaning bands after especially sweaty workouts. | Yes |
| Breathable storage bag or fabric bin | Protects the bands while allowing trapped moisture to escape. | No |
| Small pouch or divided container | Keeps handles, clips, door anchors, and ankle straps from rubbing against the bands. | Yes |
| Label or permanent marker | Identifies resistance levels when bands are similar in color or size. | Yes |
| Cool, shaded shelf or drawer | Limits ultraviolet light, heat, and accidental pressure. | No |
A storage container does not need to be expensive. A fabric bin or open-sided organizer measuring about 12 by 8 by 6 inches is large enough for many compact sets, while larger handled kits may need a container closer to 16 by 10 by 8 inches. Leave room for the bands to sit loosely rather than forcing the lid closed.
Step-by-Step
-
Gather and inspect every piece (3–5 minutes)
Collect the bands, handles, clips, door anchors, ankle straps, and carrying pouch. Separate loop bands from tube bands so you can inspect each type properly. Run your fingers along the full length of every band and look for cuts, pinholes, deep creases, flattened sections, bubbles, unusually shiny areas, or a sticky texture.
Check the stitching on fabric-covered bands and inspect carabiners, D-rings, and handle attachments for bending or rust. Do not stretch a questionable band to “test” it. Mark anything damaged and set it aside for replacement.
-
Clean off sweat and residue (2–5 minutes)
For routine cleaning, wipe each band with a clean, slightly damp microfiber cloth. If the band is visibly sweaty or dusty, use lukewarm water with a small amount of mild soap. Wipe the surface rather than soaking the entire kit.
Do not use bleach, alcohol, oil, solvent, abrasive powder, or harsh disinfectant unless the manufacturer specifically approves it. These products can dry out or weaken elastic materials. Wipe metal hardware separately, taking care not to leave moisture inside clips or around stitched attachment points.
-
Dry completely before coiling (30–60 minutes)
Lay the bands flat on a clean towel in a shaded, well-ventilated room. Allow them to air-dry fully before storage. Do not place them on a radiator, heated floor, clothes dryer, or in direct summer sun; intense heat and ultraviolet exposure can age elastic materials.
Most bands dry within 30 minutes, but thicker fabric-covered or heavily washed bands may need an hour or longer. Never seal a damp band in a plastic bag. Condensation and trapped sweat can encourage odor, surface deterioration, and corrosion on metal parts.
-
Coil each band without tight bends (2–4 minutes)
For long tube bands, form a broad loop approximately 8–12 inches across, depending on the band’s length. Avoid tiny coils, sharp folds, knots, and twists. Secure the coil loosely with the manufacturer’s strap or place it in a compartment where it cannot spring open.
Loop bands can usually be laid flat in a relaxed oval or rolled into a wide circle. Do not wrap them tightly around a narrow hook or bar. Repeated tight bending in the same location creates a stress point, especially on thin mini bands.
-
Separate accessories from the elastic (2 minutes)
Place handles, door anchors, ankle cuffs, and clips in a separate pouch or divided section. Hard plastic and metal parts can press into a band and create dents when the kit is moved or stacked.
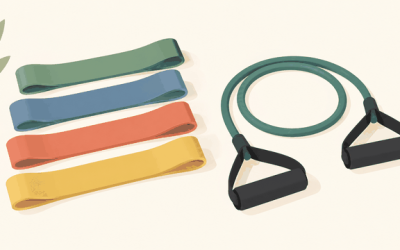
For a tube-band kit such as the WHATAFIT Resistance Bands with Handles, 150 lb Exercise Bands Set, keep the handles and connectors together but do not wind the tubes tightly around them. A multi-band set typically occupies more space than a few flat loops, so use a container with at least 1–2 inches of spare room on every side.
-
Label resistance levels (2–3 minutes)
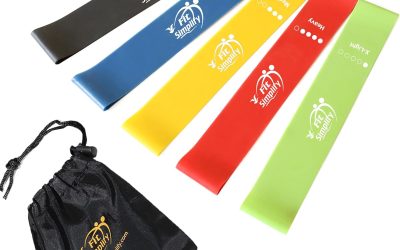
If the colors are difficult to distinguish, label the pouch or storage compartment with each band’s resistance level. Use the manufacturer’s listed resistance rather than guessing from color alone. For a five-level set of pull-up assistance bands, store the bands from lightest to heaviest and label them individually.
Do not write directly on the elastic unless the manufacturer permits it. A removable label on the storage bag is safer and can be updated if the set changes.
-
Choose the storage location (2 minutes)
Put the container on a shelf, in a drawer, or in a closet where the temperature stays relatively stable. Keep it away from windows, radiators, heating vents, garages that become very hot, and damp basements. A shaded indoor location is usually preferable to a balcony or outdoor deck.
Store the bands above the floor if possible, especially in homes with pets, children, or occasional water leaks. Do not place heavy dumbbells, boxes, or furniture parts on top of them. If you hang bands, use a wide, smooth peg and drape them loosely rather than suspending them from a sharp hook.
-
Do a final safety check before the next workout (1 minute)
Before using a stored band, confirm that it is clean, dry, and free of new cracks or stretched sections. Check that handles and clips are firmly attached. Replace a band if damage has progressed since the last inspection; do not rely on tape as a permanent repair.
Mistakes to Avoid
- Storing bands wet: Sweat and moisture trapped in a closed container can create odors and accelerate deterioration.
- Using a thin plastic bag for long-term storage: Plastic can trap humidity. If you use the original bag temporarily, make sure the bands are completely dry and the bag is not sealed around damp equipment.
- Leaving bands in direct sunlight: Ultraviolet light and heat can shorten the useful life of elastic materials.
- Making tight knots: Knots create concentrated bends that are difficult to inspect and may permanently distort the band.
- Overfilling a container: Compression from a packed drawer can create folds and put pressure on connectors.
- Mixing dirty and clean equipment: Wipe bands after particularly sweaty sessions instead of storing them immediately with clean accessories.
- Storing with sharp objects: Scissors, tools, keys, and rough-edged hardware can nick the surface.
- Assuming color equals resistance: Color systems vary by manufacturer. Read the label or manual, particularly when replacing one band in a set.
How Often
Wipe bands after each sweaty workout or whenever they feel slippery or dusty. Let them dry fully every time before putting them away. Perform a more careful inspection once a week if you train several times weekly, or at least once a month for occasional use. Clean the storage bin every one to three months, and immediately after any band leaks lotion, chalk, or another substance.
Reorganize the kit whenever accessories begin pressing against the elastic. A compact set costing roughly $17–$22 may include several resistance levels and hardware, so a few minutes of routine maintenance can be more practical than replacing an entire kit prematurely.
When to Call a Pro or Replace
Resistance bands are generally user-serviceable for cleaning and organization, but they are not good candidates for home repair. Replace a band with a visible cut, split, deep crack, frayed fabric cover, melted section, severe discoloration, persistent stickiness, or permanent thinning. Replace hardware that is bent, cracked, rusted through, or no longer closes securely.
Contact the manufacturer if the band fails unusually soon, an attachment separates under normal use, or you need the correct replacement connector. Do not glue elastic, sew through a latex or rubber tube, tie a damaged section, or cover a weak spot with athletic tape. If a band has snapped during use, inspect nearby equipment as well; the sudden recoil may have damaged a handle or clip.
FAQ
Can I store resistance bands in a drawer?
Yes. A clean, dry drawer is a good option as long as it is away from direct sunlight and heat. Keep bands loosely coiled or flat, avoid overpacking the drawer, and separate metal accessories so they cannot press into the elastic.
Is it better to hang or coil resistance bands?
Either method can work. Coiling is usually safer for long-term storage when the coil is broad and loose. Hanging is convenient for frequent use, but use a smooth, wide support and avoid narrow hooks that create a sharp bend or leave the band exposed to sunlight.
Can resistance bands stay in a car?
They should not stay in a car routinely. Vehicle interiors can become much hotter than a typical indoor room, and prolonged heat may accelerate aging. Bring the bands indoors after traveling and let them cool and dry before storing them.
How long do stored resistance bands last?
There is no universal expiration date. Lifespan depends on material, frequency of use, stretching, cleaning, heat, sunlight, and storage conditions. Inspect bands regularly rather than relying on age alone, and replace them at the first sign of structural damage.


Write Your Review
No reviews yet. Be the first to share your experience!