
This trap bar buying guide starts with the lifts you plan to do. Decide whether you want floor deadlifts, loaded carries, or a bar you can use in a rack. Then check grip width, starting height, empty weight, and usable sleeve length against your own stance, plates, and home gym before comparing prices.
Choose the frame from your weekly exercises
A trap bar places neutral handles to your sides and lets you stand inside or partly inside the frame. The overall shape determines how you enter, where the plates sit, and how much room your legs have. Compare the movement you will do most frequently at the weights you train with before buying for extra features.
A floor-only lifter may need only a comfortable grip and space to load plates. A program with reverse lunges or step-through movements can justify an open frame. For rack pulls or barbell-style work from supports, choose a compatible setup that the bar and rack manufacturers allow. These decisions involve different parts of the frame even when the listings use the same trap bar name.
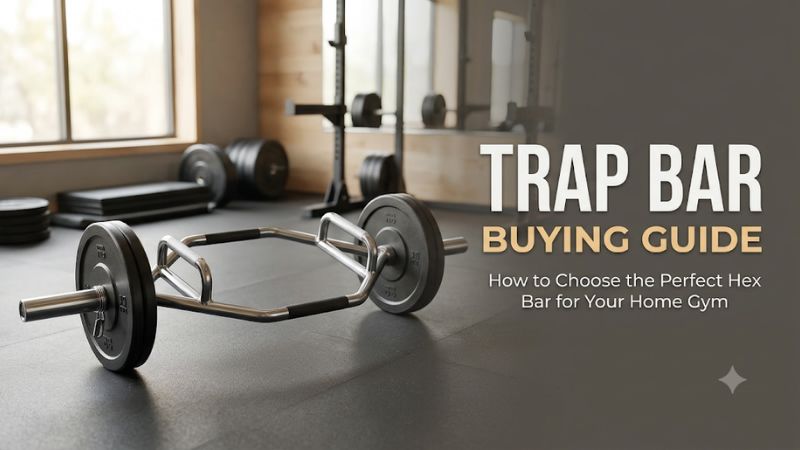
Closed hex bars for stationary floor lifting
A closed hex bar surrounds your stance with a welded or bolted perimeter. It is a straightforward choice for deadlifts and shrugs when you have room to step in, your stance fits, and the handles suit your position. For a first trap bar, a compact closed model can cover a lot of ordinary floor training.
Check the inside area front to back, especially if you take a staggered stance, bend deeply at the bottom, or use a wider stance than the product photos show. A bar may clear your knees at lockout and come close to your shins inside the frame at the bottom. Recreate a rough outline and walk through an unloaded setup before buying. Use the width between the relevant rails, not the widest outside dimensions.
A closed frame can work for carries when it clears your legs during steps and the route is wide enough. If the rear rail regularly gets in the way of the movement you want, look at the opening and grip positions of an open design. The main reason to choose a closed model is a reliable fit for your planned program at a practical size and price.
Open trap bars for step-through access
An open frame leaves one side clear. You can enter without stepping over a rear crossbar, and the open side gives the legs more room during some split-stance movements. Check the orientation of the open side relative to the handles, jack feet, and any rack attachments that will be in place when you train.
Consider which side of the bar you can approach in your room. A bar marketed for walking lunges may still sit against a wall if the only rack location is one foot from a storage cabinet. If your main advantage is entry, face the opening toward the part of the room you use. Test that layout at the size of the loaded bar, including space where the plate rims and your legs will travel.
Some open models put additional structure below the frame for loading. That can affect where your feet pass, where the bar rests at the bottom, and how easy it is to store. Ask for a side view or dimensional drawing to see how far those supports extend. The shape of the opening matters as much as the fact that there is one.
Rackable trap bars for confirmed rack work
A rackable trap bar has support points or a suitable span where it can rest on approved rack hardware. Get the maker’s rack-fit information and compare the shape with your installed J-cups and safeties. The contacts should support the intended part of the bar in the orientation required for the exercise.
Consider the complete rack configuration. Accessories, angled hooks, and a bench can change how the frame approaches the supports. When a press or rack pull uses safeties, check their intended contact with the shape of that exact bar. If the bar can be racked in one direction only, check how that changes your approach and where the handles end up.
Buy for a rack use you expect to repeat. Full-length sleeves and long contact spans can turn an easy-to-store floor bar into a larger commitment. If most of your sets start and end on the floor, the price and footprint of a compact design can be a better match. For a genuine rack purchase, factor in how and where it sits when the station is also used with a straight bar.
Fit the grips and starting height to the lifter
Handle height, spacing, and diameter should be considered as three separate dimensions. The same neutral hand position can feel different on wider grips, and a tall handle changes the distance to the floor. Compare these details around your unloaded stance, then check what your usual plates do to the starting position.
Measure grip spread in the same way across models
Ask whether a stated grip spread is center-to-center, inside-to-inside, or measured between the handle assemblies. Compare equivalent dimensions. The center of each handle is a useful reference for your hand position, while inside spacing can help you decide whether there is clear room for your body or stance.
For example, two 1-inch handles with 24 inches between their inside faces have centers about 25 inches apart, assuming parallel round handles and a straight measurement across. If another spec sheet lists 24 inches on center, the grips are about an inch closer. That difference is easy to miss when both retailers write “24-inch handle spacing.”
Make a rough physical check. Set two marks on a broomstick at the candidate center-to-center width or hold two empty handles with your palms facing inward. Find the position where they sit naturally alongside your thighs at the bottom and at lockout. For a shared gym, compare the two people with the largest difference in preferred width before paying for fixed handles.
Compare grip diameter and knurl position
Grip diameter determines how much your fingers wrap around the handle. Knurl is the machined texture that changes contact and purchase. A 25 mm grip and a 34 mm grip can feel substantially different even if the handle spacing is the same. The right choice depends on hand size, intended load, and how long you hold it.
For heavier holds, a thicker grip can be the main difficulty. Some lifters seek that challenge, and others want a handle they can consistently hold as the plates get heavier. Look for how much of the handle is textured, where the knurl ends, and whether any seams or support brackets sit inside the grip area. A narrow textured patch can limit the positions you can use comfortably.
An interchangeable handle system makes sense when you have evidence that two different widths serve your gym. A rotating multi-diameter setup is more useful for dedicated grip work. If you regularly rotate handles on a modular frame, log the configuration and the total tare weight after installation. Different kits can change both grip feel and how much you lifted.
Choose low or high handles by the range you want
High handles place your hands closer to standing height at the start and usually shorten the pull. Low handles typically offer more travel at the same plate diameter. Decide which range you want to train most often. A dual-handle design gives you both when you can safely flip the empty bar.
A buyer who trains general lower-body pulling might use the high handles for one exercise and the low handles for another. Record them separately. A newly heavier set from a higher handle position reflects a different range of movement, so it is more useful to track the variations independently than to compare them on one line in a log.
Measure actual starting hand height when plate diameter changes. If the plates are the only floor contact, an 18-inch-diameter plate has its center about 3 inches higher than a 12-inch plate. A foot or part of the frame can become the limiting contact on low profiles. Ask what plate size the maker used for any headline “loaded handle height” and confirm your setup matches if you need that exact result.
Check balance and clearance with the bar empty
A trap bar can put metal above, below, in front of, or behind its handles. Before the first loaded set, lift the assembled empty bar through the range you plan to use and observe how the frame hangs. Confirm where your hands fit along the grips and check for clearance with your knees and feet.
A built-in jack can affect how a bar tips when you set it down. Follow the intended orientation and keep the floor clear. Before you increase the load, confirm all fasteners are secured according to the manufacturer and check for unexpected movement at the grips, sleeves, or feet. If the frame lists to one side even with equal loading, rule out uneven floor contact and installation issues before continuing.
Calculate plate capacity and compatibility before checkout
The bar has to handle the planned total load, and each sleeve must hold a matching stack with its collar fully secured. These checks use different numbers. An advertised weight rating describes a manufacturer limit or test condition. The length and diameter of the sleeve describe which plates and collars physically fit.
| Specification | What to ask for | How to apply it |
|---|---|---|
| Empty weight | Assembled weight with your handles installed | Add it to both plate stacks and collars if you log them |
| Loadable sleeve length | Usable length per side | Add the thickness of the plates and installed collar |
| Sleeve diameter | Actual manufacturer dimension | Verify plate bore and approved collar type |
| Handle spread | Measurement reference points | Compare like-for-like widths and check your stance |
| Overall length and depth | Assembled dimensions | Check loading, movement, entry, and storage |
| Rack clearance | Approved support contact and rack dimensions | Compare the actual installed hooks and safeties |
| Loading guidance | What the rating includes and how the bar may be used | Apply it to the exact intended orientation and exercise |
Build your heaviest real sleeve stack
List every plate you plan to put on one side and measure thickness across its widest section, including protruding hubs. Then add the width needed by a matching collar. Measure where the collar grips and reserve that entire area on the usable portion of the sleeve. Repeat the same plate and collar combination on the other side.
Say a sleeve has 10 inches of usable length. A collar with a 1.5-inch installed width leaves 8.5 inches for plates. Two 3.25-inch bumpers and one 1-inch plate use 7.5 inches. Adding another 1.25-inch plate would bring the stack to 8.75 inches and exceed the theoretical limit. A thinner plate profile or longer sleeves can solve that specific issue. Update the calculation if the largest plate changes.
Plate fit changes over time as you buy or replace pairs. Save the dimensions of the maximum stack you use. Check it again if you add molded training bumpers or wide-handled iron plates with hubs that prevent the stack from sitting as tightly as the face dimensions suggest. A loaded stack that reaches the edge of the sleeve on paper is worth verifying before you order.
Confirm both plate bore and collar engagement
Olympic compatibility usually describes the general plate format. Actual sleeves can be close to 50 mm or narrower on specialty pipe designs. Most nominal Olympic plates may slide onto either, but lock collars may need a tighter sleeve match. Check what the manufacturer specifies for your exact model before assuming an existing collar will work.
A useful example is the Rogue TB-2. The manufacturer publishes a 1.91-inch sleeve diameter and specifically recommends axle collars. The plates and collars answer different questions. If you own several Olympic bars, write down which collars fit which one before relying on a single pair. A collar should clamp to the intended part of the sleeve and remain secure through the use the bar maker describes.
Account for the empty weight in your full load range
Use the weight of the bar with the chosen handles and attachments mounted. A frame-only number can be useful for transportation, but it does not tell you what an assembled bar will weigh during a warm-up. Some specialty frames take interchangeable handles that change the empty weight by a meaningful amount.
For example, a 60 lb bar with a pair of 45 lb plates reaches 150 lb before collars. A 44 lb bar reaches 134 lb with the same plates. A 7 kg bar with those plates is around 105.4 lb. Those weights show why you should avoid writing down a standard gym total unless you know which bar you used. Keep one convention for including or omitting the weight of collars in your log.
At the low end, choose plates that let you start where you want. A 60 lb bar may suit your top sets and still start too heavy for someone sharing it. Some lifters need the height of a full-diameter light plate before they need the extra weight of a heavy plate. The best plate purchase depends on the height and mass you need together.
Choose paid features you can use in your setup
A loading jack, interchangeable grips, a premium finish, and rack compatibility can add cost. The value of each one depends on your weekly routine, space, and current plates. Compare the practical work it saves with the delivered price and the dimensions of the complete bar. Pay most attention to features you can use regularly.
Check how an integrated loading jack tips and rests
A loading jack helps lift the sleeves so plates can slide on and off. Make sure the feet rest as intended on your training surface and have room to rotate. Check whether the largest plate clears the floor in the intended loading position. The amount of clearance can depend on floor and plate dimensions.
If you frequently switch full-size bumpers between warm-up sets, a jack can make a long training session easier to manage. A floor setup with small changes and thinner plates may use it less. Ask how much space the implement needs in front of and behind the feet when tipped. Consider where you stand while changing plates so you can reach each sleeve without squeezing between the frame and a rack.
Check assembly, finish, and repairability
Bolted handles and sleeves can make delivery easier. Confirm the assembly tools, how the manufacturer expects joint connections to be checked, and what parts it sells separately. A welded frame can reduce assembly and simplify setup. Its outside dimensions determine the whole route into your gym.
Look at the places most likely to see wear. Textured handles see chalk and sweat. Sleeves see repeated plate contact. Jack feet repeatedly touch the floor. Choose a finish and maintenance routine you can manage in your training space. If a product page has several finish names, verify which surfaces the selected finish applies to and whether spare pads, bolts, or grip kits are available.
Run a complete purchase check
Before paying, record the exact model, dimensions, assembled weight, chosen grip, sleeve diameter, and usable sleeve length. Add collars, any tools, and delivery to the total. Sketch the configured bar on the floor and in storage. Ask the seller for the missing figure if it could change your choice.
If you plan to order two handle kits for a shared bar, verify that both fit the specific frame version and price them together. If you expect to rack it, check the support configuration before assuming a conventional straight-bar storage holder can accept it. When two shortlisted options both fit, compare the policy for fit returns and damage. That detail has enough value to decide a specialty bar purchase.
Frequently asked questions
Once the frame and grip fit are clear, pay attention to unusual model claims and measurement conventions. A useful buying question refers to the exact model, chosen handles, and planned plates. This saves time when multiple lengths, handle options, and sleeve designs appear on what looks like one product page.
Do I need two handle heights for my first trap bar?
Choose two if you expect to use two distinct starting ranges. A single raised or standard position can be enough when it matches the exercise you plan to train consistently. Decide from your intended hand height using the plates you will actually use, then test the resulting position when possible.
How much does an empty trap bar usually weigh?
The value varies by model. Some light designs start near 7 kg, many conventional steel models weigh in the 40- to 60-pound range, and modular configurations can weigh substantially more. Use the stated assembled figure for your handle configuration or confirm it with the manufacturer if the descriptions differ.
Can I add rackability to a regular trap bar?
Use the frame on a rack only in a configuration the manufacturer supports. Putting blocks or improvised adapters under the sleeves can change the contact and loading conditions. A floor-only bar is still useful in a gym with a rack. Select a separate rack-compatible model when support from hooks is essential.
Will a trap bar feel the same with different plate diameters?
Plate diameter changes where the sleeves come to rest when the plates are the floor contact. Smaller plates can lower the starting height. Larger plates can raise it and affect the jack clearance. Keep that difference in mind when you train with the same load on two plate sets.
Conclusion
Choose the frame around your exercises, then confirm handle spread, hand height, and assembled empty weight. Use the exact plate-and-collar stack to check both sleeves. Pay for a jack, multiple grip kits, or rack compatibility when that feature solves a real setup problem and you have the clearance to use it.
More from Amazon
Programs that pair well with the guide above. Offers and eligibility are set by Amazon and may change.
Free shipping on eligible items, Prime Video and more. Eligible new members can start with a free trial.
Start a Prime free trialA Prime membership for ages 18-24 with a trial period. Eligibility is set by Amazon.
See Prime for Young AdultsAudiobooks and podcasts to listen to on the go. Eligible new members can start with a free trial.
Try Audible freeAd-free music streaming. Eligible new subscribers can start with a free trial.
Try Music Unlimited freeAs an Amazon Associate we earn from qualifying purchases.









Write Your Review
No reviews yet. Be the first to share your experience!