
Our Top Picks
 CERAKOTE® Ceramic Headlight Restoration Kit1 Count (Pack of 1)4 x 3 x 8 inches0.3 PoundsCheck on Amazon
The best headlight restoration kits for most drivers in 2026 are the Sylvania Headlight Restoration Kit for maximum clarity and UV durability, the 3M 39008 System for drill-assisted speed, Cerakote Ceramic Headlight Restoration Kit for the longest-lasting ceramic sealant, and Meguiar’s Heavy Duty G2980 for severely oxidized lenses.
Choosing between them comes down to how badly your lenses are hazed, whether you own a drill, and how long you want the results to last before reapplication. A light surface haze needs only polish and sealant, while yellowed, rough lenses need true multi-stage wet sanding.
CERAKOTE® Ceramic Headlight Restoration Kit, 10 Wipe Kit
Chosen because it specifies 10 Wipe Kit.
View on Amazon
3M Ultra Headlight Restoration Kit, Contains Masking Tape, Light Sanding Discs, Wax Protectant and More, Use on Plastic Lenses Headlights, Taillights and More, Easy Heavy-Duty Restoration (39195)
Chosen because it specifies Contains Masking Tape and Light Sanding Discs.
View on Amazon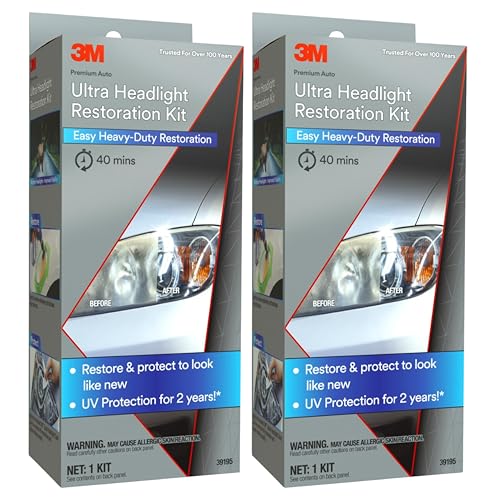
3M Ultra Headlight Restoration Kit 39195, 2 Pack (2 Kits), Removes Cloudy Yellowed Haze, 500/800/3000 Grit Sanding Discs + Clear Coat, For Plastic Lenses
Chosen because it specifies 2 Pack (2 Kits) and Removes Cloudy Yellowed Haze.
View on Amazon
SYLVANIA Headlight Restoration Kit, Restores to Like-New Condition
Chosen because it specifies Restores to Like-New Condition.
View on AmazonHow Headlight Restoration Kits Actually Work
Modern headlights are polycarbonate plastic with a factory UV hardcoat. That coating fails from sun exposure, road chemicals, and abrasion, allowing oxidation to form inside the plastic surface itself. Wiping with polish alone only removes surface film; it does not rebuild clarity.
An effective kit does three distinct jobs in order:
- Sanding: Removes the failed UV layer and oxidized plastic with progressively finer grits. Skipping grits leaves scratches that show as haze at night.
- Polishing: Uses an abrasive compound to refine sanding scratches to optical clarity. Foam or microfiber pads determine cut rate.
- Sealing: Applies a new UV-resistant clear coat. Without this step, lenses will re-haze in 1-3 months because bare polycarbonate oxidizes quickly.
Kits that omit sandpaper are only suitable for very light fog. Kits that use a wipe-on sealant without hardeners or ceramics offer shorter protection than two-part or ceramic coatings.
Comparison Table: Top Headlight Restoration Kits in 2026
| Kit | Sanding Stages Included | Polishing Method | UV Sealant Type | Tools Included | Typical Application Time (Both Headlights) | Expected Durability Before Re-Haze |
|---|---|---|---|---|---|---|
| 3M Headlight Lens Restoration System 39008 | 3 stages: 500, 800, 3000 grit discs | Rubbing compound + foam pad for drill | Wipe-on synthetic sealant (no activator) | Drill backing plate, discs, compound, masking tape | 30-45 minutes | 6-12 months |
| Sylvania Headlight Restoration Kit | 3 stages: 400, 1000, 2000 grit sandpaper | Hand polish with microfiber applicator | 2-part UV Block Clear Coat with activator | Sandpapers, activator, clear coat, gloves, tape, cloths | 60-90 minutes | 12-24 months |
| Cerakote Ceramic Headlight Restoration Kit | 3 stages: 800, 1500, 2000 grit + chemical oxidation remover | Ceramic coating (no separate polish compound) | Ceramic clear coating (single-use wipe) | Oxidation remover wipes, sanding discs, ceramic wipes, gloves | 40-60 minutes | 24+ months (ceramic) |
| Meguiar’s Heavy Duty Headlight Restoration Kit G2980 | 2 stages: 1000, 3000 grit + 2 additional hand pads | PlastX polish with foam applicator | Aerosol spray coating with UV inhibitors | Hand sanding pads, PlastX, spray coating, microfiber | 45-70 minutes | 9-15 months |
| Mothers NuLens Headlight Renewal Kit 07251 | 3 stages: 800, 1500, 3000 grit discs | PowerPolish compound + PowerBall foam ball | Synthetic wax sealant | PowerBall for drill, discs, polish, sealant, tape | 30-50 minutes | 4-8 months (requires re-waxing) |
| Turtle Wax Headlight Restorer Kit | 2 stages: 2-sided 1800/2400 grit pad + clarifying compound | Clarifying compound with precision pad | Spray sealant with UV block | Restoration pads, spray lubricant, compound, sealant, wipes | 25-35 minutes | 6-10 months |
Best Picks by Situation
Best Overall Clarity and Longevity: Sylvania Headlight Restoration Kit
Sylvania remains the benchmark when lenses are yellow, rough to the touch, or have peeling clear coat. The 400-grit starting paper is aggressive enough to level pitting, and the progression to 2000 grit followed by a true two-part UV clear coat (activator + clear coat) creates a hard, glossy barrier rather than an oily wipe. It is the most involved process and requires careful masking because the clear coat cannot be wiped off once cured, but it delivers the closest result to a factory coating in terms of UV resistance and outdoor durability. General market range is typically $20-$28 for this type of premium hand-sanding kit.
Best for Drill Owners and Fast Results: 3M 39008
3M’s system is built for speed with a standard household drill (1200-1600 RPM recommended). It uses adhesive discs on a backing plate instead of hand sheets, which cuts sanding time by half and reduces uneven pressure. The included 500-grit disc handles moderate oxidation well, while the 3000-grit Trizact disc refines the surface before compounding. The trade-off is the sealant: it is a simple synthetic wipe with no hardener, so it will require reapplication sooner than Sylvania or Cerakote, especially for cars parked outdoors daily. General range $15-$22.
Best Long-Term UV Protection: Cerakote Ceramic
Cerakote differs by using a chemical oxidation remover wipe before sanding, which reduces the amount of manual sanding needed on lightly to moderately hazed lights. Its final step is a genuine ceramic coating that chemically bonds to polycarbonate and cures to a hard, hydrophobic layer. When applied correctly to a fully sanded and decontaminated lens, it resists re-oxidation and car wash chemicals longer than acrylic sprays or waxes. It includes no traditional polishing compound, so on severely yellowed lenses you will still need to sand thoroughly to avoid trapping haze under the ceramic. General range $18-$26. Single-use ceramic wipes cannot be saved once opened.
Best for Severely Oxidized or Pitted Lenses: Meguiar’s Heavy Duty G2980
Meguiar’s kit is designed for lenses that have gone beyond haze to a deeply yellowed, textured surface. It pairs 1000 and 3000-grit sanding with its well-known PlastX polish, which has more cut than most included compounds, and finishes with an aerosol UV coating that provides more even coverage than hand wipes if you mask properly. The spray requires calm air and careful overspray protection, but it builds a thicker film than wipe sealants. General range $22-$30.
Best Budget / Light Haze Option: Turtle Wax and Mothers NuLens
If your headlights are only slightly cloudy or you want the quickest maintenance refresh, these drill or hand kits make sense. Turtle Wax’s two-sided pad and clarifying compound can be done in under 35 minutes with minimal sanding, while Mothers NuLens uses its reusable PowerBall foam tool that is useful for future polishing jobs. Both rely on lighter sealants (spray or wax) that improve gloss quickly but need more frequent reapplication if the car lives outside. General range $10-$18.
Decision Matrix: Which Kit Fits Your Situation?
| Your Situation | Choose This Type | Why |
|---|---|---|
| Lenses are yellow/brown and rough, car parked outside | Sylvania or Cerakote | Need aggressive sanding + hard UV cure to prevent rapid re-haze |
| Moderate haze, you own a drill and want speed | 3M 39008 or Mothers NuLens | Drill backing plate/PowerBall cuts labor from 90 min to ~35 min |
| Lenses are heavily pitted from highway driving | Meguiar’s Heavy Duty G2980 | Higher-cut polish + 1000-grit start levels deeper defects |
| Light fog, leased car or quick sale prep | Turtle Wax | Least aggressive sanding, fastest clarity boost |
| You want longest interval before doing it again | Cerakote Ceramic | Ceramic chemistry outlasts wax/synthetic wipes in UV testing |
| No garage, windy or dusty driveway | Sylvania or Turtle Wax (wipe sealant, not spray) | Avoid aerosol coatings that attract dust while curing |
Cost Per Use and What to Expect
Most kits are sold as single-vehicle, single-use consumables. Sandpaper, discs, and sealant wipes are not reusable once contaminated with plastic dust or once a two-part activator is mixed.
A worked example for a typical price tier: If a kit in the $18-$26 range restores two headlights and protection lasts 12 months before haze returns, the cost is $9-$13 per headlight per year. A professional shop restoration typically ranges from $75-$150 for both lights. For a car you plan to keep 3+ years outdoors, a kit with a ceramic or two-part UV coat that lasts 18-24 months cuts the annualized cost in half compared to reapplying a 6-month synthetic sealant twice a year.
All kits cover standard headlight sizes (roughly 8 x 12 inches to 10 x 16 inches per lens). Larger truck or SUV lenses, or additional fog lights, may require a second kit. Check that the kit includes enough masking tape; most include only 2-3 feet, which is rarely enough to protect paint around both lights. Having a roll of automotive masking tape on hand prevents clear coat or compound from staining trim.
Durability and Ownership Realities
The restoration itself does not wear out, but the new sealant does. UV exposure is the primary failure point, not the polish.
- What wears first: The sealant edge near the top of the lens where sun hits hardest. Look for a faint rainbow or return of micro-cracks after 6 months. Ceramic and 2-part coatings resist this longer than wax or single-wipe synthetics.
- Consumables: Sandpaper loads with plastic and must be kept wet. Rinse discs frequently. Once a UV wipe or activator is opened, it cures with air exposure and cannot be stored for next year.
- Cleaning after restoration: Wait 24 hours before washing. Thereafter, wash with pH-neutral car soap and avoid abrasive compounds or automatic brush washes that strip coatings. A spray ceramic booster every 3 months can extend life of non-ceramic sealants.
- Common mistakes: Dry sanding (causes deep scratches), not progressing through all grits, polishing in direct sun (compound dries too fast), and applying sealant over residual polish oils. Wipe lenses with isopropyl alcohol (65% or higher) before sealing to ensure bonding.
- When a kit is not enough: If the haze is on the inside of the lens, if there is moisture condensation inside the housing, or if the polycarbonate has spider cracks all the way through, no external kit will fix it. Replacement housings are the only solution in those cases.
Application Time and Setup Tips
Plan for 45-90 minutes for both lights if sanding by hand, 30-50 minutes with a drill. Tape generously around the headlight, covering paint, rubber gaskets, and grille edges by at least 2 inches. Work wet, using a spray bottle to keep sandpaper lubricated and to rinse slurry. Sand in one direction per grit (e.g., horizontal for 800, vertical for 1500) so you can see when the previous scratches are gone. Polish until no sanding haze remains when dry, then seal in a shaded, dust-free area.
Frequently Asked Questions
Do I need a drill for headlight restoration?
No. Hand kits like Sylvania and Cerakote achieve excellent clarity without power tools and give more control on curved lenses. Drill kits like 3M and Mothers save effort and time but require a careful low-RPM technique to avoid burning the plastic with friction heat.
How long does a headlight restoration last outdoors?
With a synthetic wipe or wax sealant, expect 4-12 months for a daily outdoor-parked vehicle. Two-part clear coats typically last 12-24 months, and ceramic coatings can exceed 24 months if maintained. Vehicles garaged or covered will see 30-50% longer intervals.
Will restoring headlights improve night visibility?
Yes. Severely oxidized lenses can reduce measured light output by 50% or more. Removing oxidation and re-sealing restores beam pattern and brightness. It does not increase bulb wattage, so still aim headlights correctly after restoration.
Can I use the kit on taillights or fog lights?
Yes, if they are clear polycarbonate. Most kits have enough material for two headlights plus small fog lights, but large taillights may require extra sandpaper. Do not use aggressive 400-500 grit on taillights with thin coatings; start with 1000 grit.





Write Your Review
No reviews yet. Be the first to share your experience!