
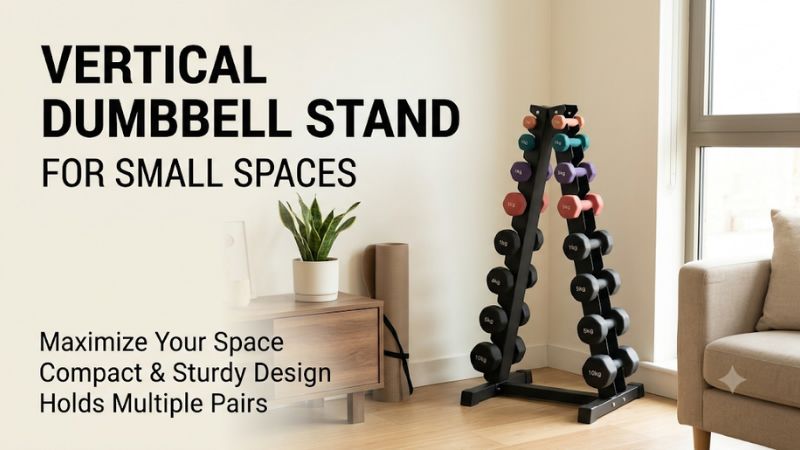
A vertical dumbbell stand for small spaces works when its loaded width and pickup path fit your room. Measure the feet, the heads that extend beyond the frame, and the space your hands need at each cradle. A narrow rack can still block a doorway or become hard to use if its lower slots face a nearby wall.
Measure the space the rack will actually use
A rack has a footprint when empty, another when loaded, and a third when you are retrieving a dumbbell. Measure all three. A stand that fits inside a 16-inch gap can still be a poor choice if the heads project beyond it or your stance takes up the route through the room.
| Area | What to measure | Practical check |
|---|---|---|
| Bare frame | Base feet, frame width, height, and assembly clearances | Tape the frame on the floor and open nearby doors or drawers |
| Loaded rack | Widest heads, depth beyond the base, and weight of the full setup | Measure your largest dumbbells and estimate their position on the rack |
| Retrieval area | Space for your hands, stance, and lift-off path | Rehearse picking up a lower pair with the neighboring positions occupied |
| Return route | Path from bench or mat to the cradle | Walk it with the room in normal use |
| Growth space | Space used by the next larger pair you expect to buy | Check whether it changes the loaded width or demands a different layout |
Mark the base on the floor before comparing models
Start with a tape measure and the available floor rectangle. Include baseboards, heating covers, desk legs, and any other obstruction near the ground. Measure between actual contact points. A frame can fit between two walls on paper while a baseboard pushes one foot into the walkway.
For a documented example, the FitRx rack measures 14.6 × 12.6 in at its listed base dimensions and is 20.9 in tall. Using those first two numbers gives about 184 sq in, or 1.28 sq ft, of bare rectangular area. That calculation lets you compare footprints across products. It leaves retrieval clearance to your room and dumbbell shapes.
Mark the rectangle and open the nearest door. Then sit down or roll the chair back if the area doubles as an office. A rack that fits during measurement can conflict with everyday movement once the ordinary furniture positions return.
Add the heads that extend beyond the rack
Dumbbells usually add some space around the frame. Measure the overall length and widest head of the pair assigned to the most exposed position. Depending on the orientation, the heads may project across the rack’s width or depth. The heaviest pair and the broadest pair can be different when the collection mixes series.
An illustrative rack with a 14 in frame depth plus a head that projects another 3 in toward the room uses 17 in at that level. If the opposite side also projects 3 in, the loaded depth becomes 20 in. These are example dimensions. Use the drawings or actual loaded measurements for the design you choose.
Check upper slots too. A head at thigh height can catch on a chair arm or narrow passage even if the bottom clears. With a tower under a shelf, include the height above the top cradle needed to lift a weight out without hitting the shelf.
Separate the pickup path from the parking spot
Some stands let you bring the weight mostly straight up. Others require a short lift and movement away from the frame. Imagine where your hands and feet need to be. A tight gap beside a wall can leave a cradle visible and still make it difficult to place both fingers around the handle.
Rehearse the movement with a light practice object near the proposed location. Check a bottom pair and a middle pair. Look at whether you need to angle your wrist around an adjacent head or move sideways to avoid the wall. A rack you can use comfortably at the last repetition is more practical than one that only works when you start fresh.
A 3-sided stand deserves a separate approach measurement for each face. Turning the stand diagonally can improve access in an open workout area. In an alcove, the rotation may still leave a rear position unreachable and expand the loaded footprint in an inconvenient direction.
Decide how many pairs the room needs to support
Vertical storage becomes useful when several fixed pairs need a permanent home. The best pair count comes from the weights you actually use each week. A small room often benefits from one rack sized to the current collection, with enough capacity for a planned addition if you know which pair comes next.
Match the rack to the pairs you can name
A collection of two pairs can fit on a low, suitable shelf with enough room for both grips. Four pairs can justify a short A-frame. Six or more may benefit from a wider or taller rack, depending on their sizes. Write down the loads the rack will contain and identify any dumbbell that may be hard to reach at a low or high position.
For example, 5, 10, 15, and 20 lb pairs total 100 lb. Add a 25 lb pair and the same room must accommodate five pairs totaling 150 lb. The new pair affects how far the largest heads project, how heavy the installation is, and potentially the required retrieval height.
Keep odd singles in the calculation. One 30 lb dumbbell contributes 30 lb and occupies one position, but an unevenly loaded stand may have placement rules. Follow its instructions. If your collection is mostly mismatched singles, a suitable shelf can give you a more flexible arrangement.
Plan for the next pair by its size and weight
A fully loaded rack can look like it has room for growth when there is a visible gap above or beside a pair. Only use the designated positions. Check whether the next dumbbells fit the approved load and physical size for those positions. Count their impact on the total weight too.
If the new pair is substantially bigger, place a paper outline of its head on your floor plan. The empty rack footprint will stay the same, but the usable path can get narrower. This matters in a room where a bench must move in front of the stand or where the outer heads are close to a door.
A small homeowner example illustrates the trade. A short stand could hold the four pairs used for the current routine. The planned fifth pair is much larger and used only for unilateral rows. A dedicated low resting position for one heavier dumbbell might make better use of the room than moving to a much larger five-pair tower.
Know when to stop expanding vertically
A ten-pair rack can be an efficient floor-area choice in an open room. Under an overhang or close to a corner, its access requirements can become harder to meet. Putting more weight into the same area also changes the total load the floor and underlying surface need to support.
Use the complete collection weight and the empty rack weight when planning the location. A 5–50 lb sequence in 5 lb steps contains 550 lb of dumbbells. A stand’s load rating applies to the stand under the maker’s conditions. Verify that the placement and floor are suitable independently, particularly where a very heavy installation is involved.
If your space cannot accommodate the retrieval path or loading, consider a smaller fixed collection or a compatible adjustable setup. The best choice depends on whether you need several pairs available at once or can select loads sequentially on two handles.
Choose a layout for your room
The stand’s best orientation depends on the furniture and direction of travel through the room. An exposed wall, low alcove, and shared living area offer different access. Test the normal room arrangement and the arrangement you will use while lifting before settling on a position.
Use a low A-frame under an open shelf
A short stand can work under a high enough shelf if every weight can be removed without touching the shelf or wall. Check the height above both the empty supports and the loaded head. A dumbbell needs enough room to clear the cradle before you move it out toward the room.
Place the most frequently used pair in an approved position that is easy to see and reach. If the lowest pair needs repositioning, make sure you still follow the rack’s loading instructions. Lighter items placed above can leave more clearance for hands, but the manufacturer’s designated positions control the setup.
Use a firm, level surface. A mat can help protect a compatible floor, provided it does not create uneven support under the feet. Check whether the feet sit flat and whether the surface remains stable under the full load.
Use a narrow tower beside a bench with an open approach
A tall tower can keep fixed pairs near the bench while using less base space than a long horizontal rack. Route yourself to the working side without stepping over the bench feet. With an incline bench, mark the adjusted position too. The angles and placement can change the available aisle.
The Hampton five-pair tower provides an example of a 14.5 × 15 in published base. It also stands 43.5 in high and supports specified Hampton lines. A small base is valuable only if head projection and hand access remain acceptable. Match the exact dumbbells before planning around the frame.
Keep the routine’s heaviest and most frequently used pair in the position approved by the maker. Walk the path for taking both weights to the bench and for returning them after the last set. If the route requires reaching around a bench post, placing the rack elsewhere may be easier than buying a taller model.
Use a clear wall or open corner for several access faces
If a rack holds dumbbells on more than one side, check each side. A two-sided rack may be useful near the end of a bench, where both faces are reachable. A three-sided rack often needs an open position, rather than being pushed against a corner. Measure movement around it facing the direction from which you will lift.
A good test is to mark each pickup position on the floor. If a mark lands inside a walking route, behind furniture, or too close to a wall for a controlled lift, move the rack outline and test again. A different orientation can give you more usable storage without reducing the number of pairs.
Keep nearby cabinets and doors in their normal positions. A hinged door that opens into the workout area can collide with a loaded rack head, and a drawer can cut off the return path. Check the room with the door fully open and confirm people can move through it during training.
Keep a shared living area easy to reset
If the room is used for several activities, choose a spot where the stand can remain in place. Emptying and moving a loaded rack each day adds work and can be impractical. A dedicated low stand or a suitable closed space for a few light pairs may make the room easier to reset.
If small children or pets are present, treat the storage location as part of access control. Follow any restraint or installation guidance for the equipment, keep the assembly away from play and traffic routes, and use a secure location appropriate for the household. Avoid positioning heavy weights where they can be pulled from an exposed upper slot.
Make the bench or mat the item you move if that is easier than moving the loaded inventory. Keep a clear place to put the in-use pair down under control. This can improve access without turning the rack into a piece of equipment you need to relocate after every session.
Check the floor, assembly, and long-term access
A small stand can concentrate a meaningful amount of load on a small set of feet. Assess the floor and support surface independently of the rack’s rating. Then assemble it according to its instructions, check how it sits empty, and verify that every weight can be seated and retrieved.
Use the total of the rack and all stored dumbbells
If a rack weighs 27 lb empty and stores 150 lb of dumbbells, the floor carries 177 lb in the example. Place all feet as the manufacturer intends. For surfaces with unknown capacity or a concentrated heavy collection, verify that the location is suitable before loading it.
A mat does not make an unsuitable floor structurally sound. It can reduce direct contact and help protect a compatible finish. Check that it stays flat, includes the whole base, and does not make the rack lean as the load changes from side to side.
Check fasteners and run through each available position
Build the rack on its intended surface, following the assembly sequence. Verify that all the feet make contact and that the supports face the correct way. A foot that floats empty or after loading a light test pair deserves investigation before the heaviest weights go on.
Use appropriate pairs in the designated positions and verify that each one sits fully. Check for rubbing, tilted seating, and fingers getting trapped between adjacent heads. Inspect the cradle inserts and fasteners periodically, and relocate the stand unloaded if a better place becomes available.
Frequently asked questions
A small-space purchase is usually settled by the smallest usable slot, the largest loaded head, and the room to approach it. These answers address places where shoppers often use the empty frame measurement when they need to think about the whole loaded setup.
Can I place the stand against a wall?
Yes if the model can be used from the exposed side, the loaded heads clear the wall, and all manufacturer clearance and installation instructions are followed. A rack designed for access on multiple sides needs enough space to use those faces.
Is a tall rack always the smallest choice?
A tall rack can have a compact base and large access requirements. A low shelf or short A-frame can work better for a few pairs under an overhang. Compare loaded width, height, and pickup clearance before deciding which style frees more space in your room.
How much space should I leave in front?
Use the actual dumbbell and cradle geometry to establish clearance. You need room to place your feet, take a full grip, lift the weight off its supports, and move it to the working area. A practice run with a manageable weight can reveal obstructions that a tape measurement misses.
Can I use a vertical stand beside a foldable bench?
Yes if both working positions remain accessible. Mark the bench feet when it is open, then check the path you use to pick up and return a pair. Verify that the folded bench has a separate supported location where it cannot fall against the loaded rack.
What if the rack fits but the lowest pair feels awkward?
Check whether the maker allows a different assignment of weights. If the pair is too wide, the slot is hard to reach, or the return path is obstructed, select a different placement or rack. A lower, easier approach to that particular pair may matter more than the total floor area.
Conclusion
A vertical dumbbell stand for small spaces should fit your loaded weights and your pickup path, not just the dimensions marked on the box. Choose a profile and pair count that cover the equipment you use. Then test the location with the biggest pair in mind, furniture in its normal position, and a clear route from the rack to your workout area.
More from Amazon
Programs that pair well with the guide above. Offers and eligibility are set by Amazon and may change.
Free shipping on eligible items, Prime Video and more. Eligible new members can start with a free trial.
Start a Prime free trialA Prime membership for ages 18-24 with a trial period. Eligibility is set by Amazon.
See Prime for Young AdultsAudiobooks and podcasts to listen to on the go. Eligible new members can start with a free trial.
Try Audible freeAd-free music streaming. Eligible new subscribers can start with a free trial.
Try Music Unlimited freeAs an Amazon Associate we earn from qualifying purchases.









Write Your Review
No reviews yet. Be the first to share your experience!